Page 1 of 2
Project status: disassembled
Posted: Tue Sep 26, 2017 5:12 pm
by rcousine
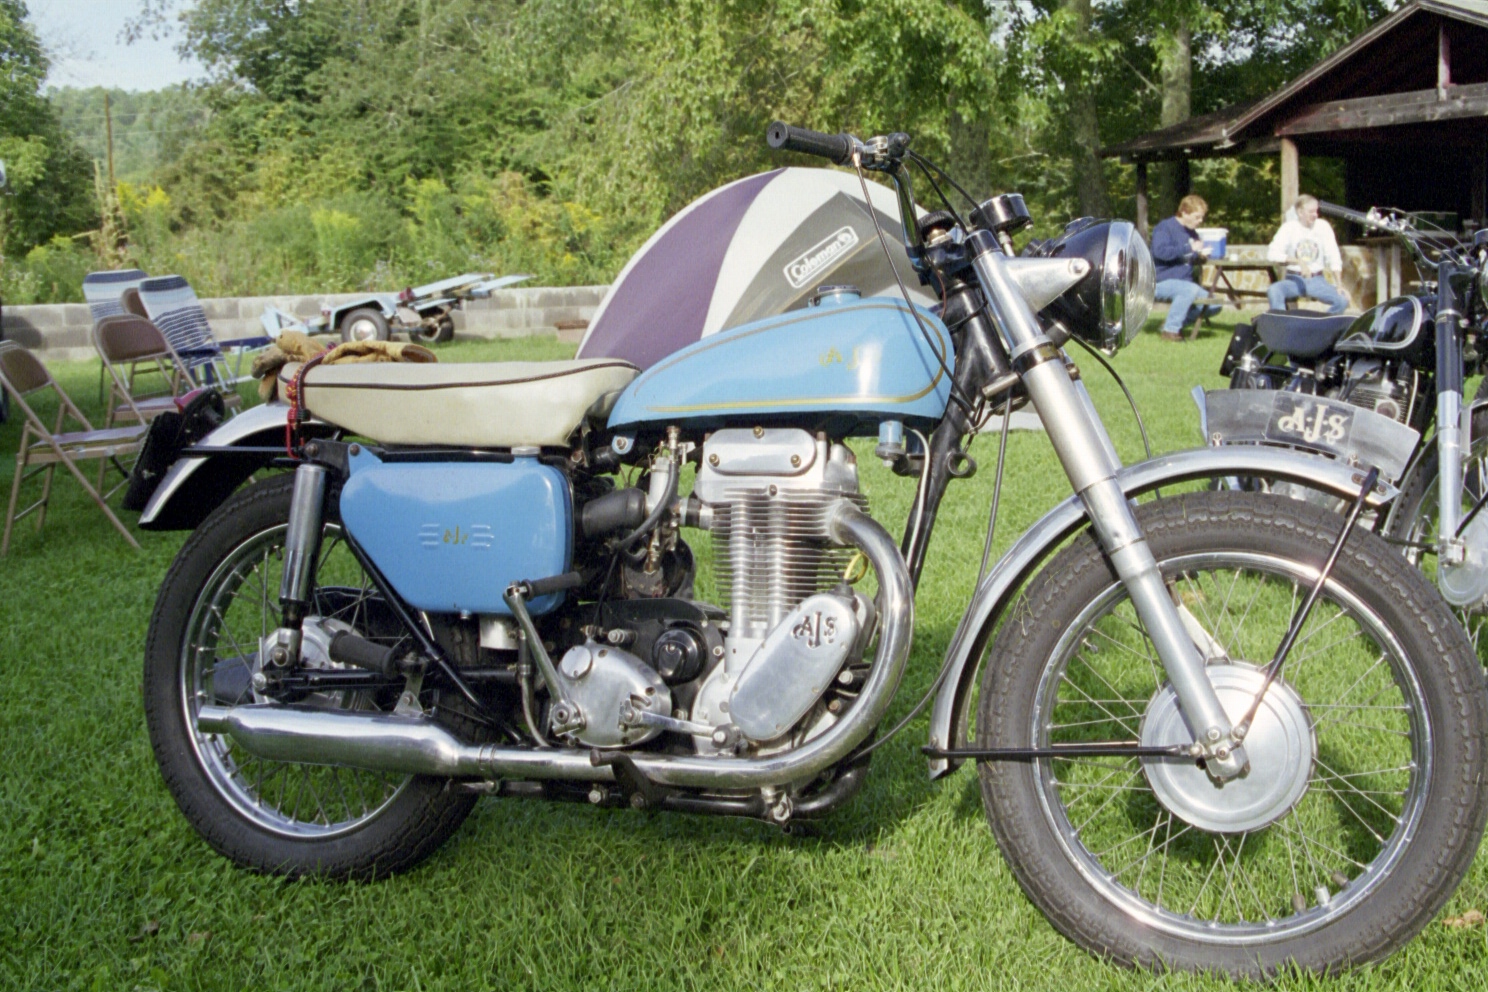
So, the 1958 AJS 18 CS is disassembled (apologies for the huge images, I'll try to sort that out):
And there you can see the silly mugs that did it.
The to-do list is long. The transmission case needs a boss welded, the triple clamp is resisting our efforts to remove it, I need to dig in far enough to figure out a compression problem, many bent or bad fasteners...
1. Seat update: after hearing all options, I'll probably rebuild the seat pan I have. Does anyone have good photos of a stock 1958 18 CS (or G80 CS, of course) dual seat mount, or pan? I need to reconstruct the front mount, which was definitely bodged into service at one point. My dad complained the rear of the seat was not well supported, and he ran braces from the rear of the seat back to the seat mount point. It seems like the CS saddles had a bit of an elevated height compared to the regular S model bikes. (Kudos to the Deeley Museum here in Vancouver; I sent a request to find out if they had an 18 or G80 in their collection, and within hours they sent photos of their 1966 G80 CS, and showing great optimism, invited me to their June Show n Shine).
2. Fasteners: I'd love to buy a fastener kit, mainly to replace some nuts and rods that were seized or otherwise messed up. Can anyone point me to a good source of such? Does the Spares Service stock one? Is there a vendor that does generic Whitworth motorcycle fastener kits?
3. The fork: can someone point me at a good, comprehensive guide to disassembly and service? I know I need one stanchion (it's quite bent). I understand a special tool is needed to get the fork apart, but that it is fairly easily built? Also, the triple clamp top nut is resisting my largest wrench. Is there a trick to disassembling that, or is there a special tool, or is the socket for that nut size readily available, or...?
(I have printed out a copy of the service manual, and a poster-size enlargement of the teledraulic fork diagram is taped to my workshop wall, but it's not obvious to me what is going on at key points of the disassembly.
4. Anything else? I've now got a mostly disassembled bike, and my goal is to make everything right to turn it into a regular runner, but not a perfect restoration. (It will have, for example, a pleated seat, because my dad sewed one for this bike as a teenager, and has pledged to sew a new replacement). Is there preventative stuff I should dig into while I have the bike apart? It will not be a daily driver, but I do want to be able to ride it at will on sunny days.
Re: Project status: disassembled
Posted: Tue Sep 26, 2017 5:57 pm
by dave16mct
Welcome to the forum, that's a great project you have. The seat look like a BSA type to me. Have a look in Christian's archives at the pictures of a 58 18cs. here:
http://archives.jampot.dk/general/Pictu ... 8%20CS.jpg
You will find lots of info for stripping the forks by doing a search. I don't know anyone who does a complete SS set of fasteners but you will have to make your own list and source them from various suppliers. Our own spares scheme do quite a selection. Steve Surby at AMC Classic Spares is has a good range of spares for CS models and knows a lot about them. (Also Mike Partridge at Waldridge Motors, Ontario)
Cheers Dave
Re: Project status: disassembled
Posted: Tue Sep 26, 2017 6:32 pm
by StephenG80
When you come to re-fitting your overhauled forks back into the yokes, if its a bit of a tight fit, compressing them like this (ignore the cable tie)
Capture.JPG
Capture 1.JPG
beforehand make its a doddle. Look forward to seeing the finished bike.
Re: Project status: disassembled
Posted: Tue Sep 26, 2017 7:05 pm
by rcousine
Thanks all!
Dave: My seat being a BSA pattern makes some sense, time for some hard choices about keeping it or replacing it.
Stephen: thanks for the suggestion regarding compressing the shrouds. This keeps them (and the spring) out of the way so they're not trying to push the fork out of place as you slide the stanchion into the triples, right?
Re: Project status: disassembled
Posted: Tue Sep 26, 2017 8:44 pm
by StephenG80
[quote Stephen: thanks for the suggestion regarding compressing the shrouds. This keeps them (and the spring) out of the way so they're not trying to push the fork out of place as you slide the stanchion into the triples, right?[/quote]
Yes, basically it means you don't have to compress and fight the spring as part of the effort of pushing the forks (stanchions) into the triples. It also means any nice new paint work on top of shroud is not dinged with multiple attempts and,once in, the pressure can be gently released until the shrouds are in full contact.
Re: Project status: disassembled
Posted: Tue Sep 26, 2017 9:05 pm
by zwarts
I always cringe when I see some of the lash ups devised to pull the fork stanchions back into place.
A fork puller which will not slip, taking your skin and paintwork with it, is easily made or can be bought for very little cost..
Making these special tools is an integral part of the fun of restoration with these old bikes.
Cheers, Bob.
Re: Project status: disassembled
Posted: Tue Sep 26, 2017 10:20 pm
by StephenG80
Cringe away all you want Bob, fill your boots! - this will not slip due to how its been set up and thought out, ie a front to back cross over on the plane of pull ensures a pull into the stops of the pull as well as vertical pull, its a pretty basic engineering principle. It's an eloquent simple solution, it won't damage the paint work and was made with what was available. It was special "tool" made on the spot and works VERY well and was a fun satisfactory solution at the time. I guess some folk either have the ability to resolve problems or they don't so have to rely on other's special tools instead. If that is what you have to do Bob fine - I don't have to though.
Re: Project status: disassembled
Posted: Wed Sep 27, 2017 9:17 am
by Triumph-Legend
Hi Guys, Just noticed! The peg on the swinging arm that stops the rear brake plate rotating looks a bit odd in the picture. Might be worth checking when refitting the rear wheel assembly. Not a big deal as there is another brake at the front if needed. Hmm, second look,58 bike, so different securing peg arrangement to the earlier bikes? I'm probably talking rubbish here, but check any way. Better safe eh.
Why did you take the bike to bits? A quick wipe with an oily rag with maybe a bit of WD40 usually sorts out most known faults on these bikes.
Have fun with the bike and remember the golden rule. JUST NAIL IT!!!!
Er, Just loosen of the fork top nuts a few threads, give the forks a bit of a wiggle and you should see the legs drop down. If the don't, it because they are rusted into the lower yoke. A bit of freeing oil often is enough to free them off. Removing the top nuts completely will allow the fork legs to come flying out and can cause damage. To remove the chrome tube oil seal holder, I use an old Ducati handle bar, it's about the perfect size to work as a ring clamp without damaging the chrome part. If the tube is hard to shift, give the joint a good clean and apply some freeing oil for a couple of days, some heat applied to the top of the fork leg should then easily free it off without damage to the slider internal threads. Do use a new sealing washer and a dab of Wellseal other sealer on the bottom damper retaining screw in the bottom of the fork slider. It is not unknown for these to leak after a time. Fork legs can be straitened if only a little bent. Other than this, some bushes and a couple of seals and it's job done. Good idea to make up an assembly tool from an old top nut drilled and tapped 12mm, and a length of studding, couple of nuts and washers. Machine the hex flats of the old nut, fit the stud and there you have a fine fork tool for very little cost.
26 TPI is what you need for the machines engine studs and most fastners unless the thread is into aluminium eng ' g-box case. Generally 1/4 - 5/16 - 3/8 - 7/16 26TPI taps and dies will be all that you will ever need. Then 1/4 whit and a 2BA tap. somebody is bound to come up with a couple more sizes, but I can't think of any right now.
Please note, UK motorcycles use aluminium cases. Here in the UK aluminum is hard to come by, almost as rare as unobtainium. Also, a triple tree is three trees together. I fail to see were these could be used on a motorcycle.
Wow, that number plate/rear light mount on the ally rear guard looks pants. Ah well, different folks etc.
Re: Project status: disassembled
Posted: Thu Sep 28, 2017 3:41 pm
by zwarts
22054461_1470152596398331_1129008267_n.jpg
"I guess some folk either have the ability to resolve problems or they don't so have to rely on other's special tools instead. If that is what you have to do Bob fine - I don't have to though."
Here is my engineering solution. Took about an hour to make using my lathe and oxy-acetylene welding gear. That was around 20 years ago and it has been used countless times since. The thrust bearing is a little luxury which reduces friction when you are pulling the stanchion into place in the top yoke. With this tool both hands are free to align the various spacing collars and rubber washer (this is for the 1955 onwards 1.25" dia. stanchion) whilst the stanchion weight is supported by the puller.
So as you can see Stephen, I don't have to rely too much on outside help or assistance!
Re: Project status: disassembled
Posted: Thu Sep 28, 2017 4:55 pm
by 56G80S
Bob, makes my version look really basic but the same principle - yours as I would expect from someone with your skills and kit - looks great and probably very smoothly. Length of threaded rod from farm shop, nuts, washers (larger heavy copper one at the top with oil applied and cut down knackered top nut drilled through and heavy spilt pin bent round to miss the threads. Lock two nuts together at the top to wind up the stanchions.
It has also had good use and will again this winter. Must've cost all of £3 and no undue pressure on anything.
But I can't decry what works for someone even if I wouldn't be comfortable with it.
Johnny B