Lightweight Electrics
SO you want to know about the wonders of Wipac electrics as fitted to those 250s and a few 350s. Perhaps I shouldn't let it be known that I haven't actually had one of these things but I've been very close to the Wipac bits on the lightweight Norton I own. So what have we got? And what is the problem? Luckily (?!) all these machines use all the same Wipac bits so if I give you the low down on the electrical part without being specific to any motorcycle model then I'm sure you'll get the gist.
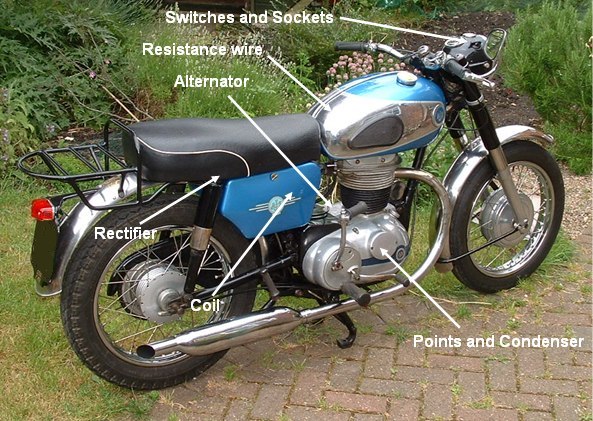
Alternator:
This part has always been a winner as far as I can see, without any built in snags or self-destruct modes as with some of the Lucas items. And of course the rotors / stators interchanged with the Lucas parts. The only story of any significance with regard to Lucas / Wipac alternators is when an accomplice did an electrical test between the two, he used his Commando wiring system as the electrical load. He measured the output from the fitted Lucas alternator, then put the lightweight Norton with Wipac alternator alongside to power the Commando electrics. Bingo more power from the 30 year old Wipac rotor / magnets! So don't put that part down.
Rectifiers:
As far as I can ascertain these were always the large flat square things, in duckegg green, perhaps with a rubber edging. If so then they are most likely Selenium! Easy answer for these items throw them away. The modem 'encapsulated' silicon rectifier is so cheap, neat and fits all. Please note that ALL these items are 'solid state'. The term 'solid state' always refers to a device that is other than a vacuum valve such as the ones we had in the radios of the 50s. Encapsulated is the word you need!
Resistance wire:
This is another part of the charge circuit that is prone to being updated. It is used to reduce the charge rate when you are on ignition only. When you switch onto side lights the resistance is taken out of circuit, and the charge rate stays the same (this all assumes we have an original 6V system!). Should the thing fail then there will be a tendency to overcharge with lights off. I'm sure you can then watch the ammeter and judge battery charge yourself, or run side lights on! If you really must then you could replace the resistor wire with a 10 Watt resistor of about 3 or 4 ohms (or do it properly and go 12V, but we'll talk about that later).
Switches:
Perhaps not considered part of the charging equipment but they switch the alternator in and out so they do bear some responsibility for quite a few failures. They are horrible things but we're stuck with them. If you are of a mind to tear them apart and rebuild, then go careful. You get the usual pile of balls, springs and levers flying about! The back plate of the switch is almost always made of cheap 'cardboard'. I've had several crumble in the middle of the rebuild! You can clean these things up, get rid of the rusty shafts inside, a little light oil in the right place and perhaps some electrical grease (MS4) or Vasolene in the other places. Clean up all the brassy bits with worn emery cloth etc., but take note that there is a little link slotted onto a couple of prongs that also needs some cleaning on the surfaces that contact the prongs that go to the outside world. This needs a careful bit of attention to clean it up, perhaps even solder it very carefully in place to reduce future failings. But be careful of the rotating contacts getting fouled up with dodgy soldering. Now comes the clever bit, rebuilding! There's not a lot to say really earmuffs on the cat is a good start to save it hearing the bad language, and perhaps waiting until 'her indoors' is out because you don't want to be told about the need for a new washing machine in the middle of this job! A small vice is good to hold the thing steady and rebuild it from the front, i.e. look to fitting that 'cardboard' back plate over the prongs as the last job. Best of luck!
The sockets:
On the back of these switches they're just bad news! If any one has come up with any real answer apart from soldering short wires and using some connectors, then let us know.
Ignition coils:
These Wipac units I've always found to be more reliable than Lucas ones, so stick with them. The only observation is something I've mentioned recently but bears repeating. The coil connections are marked CB and SW, i.e. Contact Breaker and Switch. Fine ... pretty obvious BUT these coil connections are in fact polarity conscious SO unless you know the polarity that the coil is intended for then they are in fact useless. Now as it happens, all Wipac coil systems I've seen are for positive earth. But if you do for some strange reason (like fitting a modern car radio CD changer!) change the polarity to Negative earth then you will have to swap the connections around to follow the battery. Further cause for worry could also arrive if you fit some electronic ignition (good ol' Boyer!). Follow it through logically, or ask your ignition supplier. If he doesn't know then perhaps you shouldn't be buying from him!
Points:
Horrible nasty things! Fit electronic. (CR told me to say that!). Seriously though folks, the Wipac points plate is not replaced by the Lucas one, not that that was any better! The Wipac plate is 3ö (bit bigger than Lucas). This made it awkward at first to fit Boyer ignition as the Boyer pickup stator plate at 2 3/4" directly replaced the Lucas points plate. But we do have a 3ö Boyer plate as well now (more about fitting Boyer later). Still got those nasty condensers but can't find the original one to fit? Then get any new one from the car world that can fit or be made to fit. Sometimes there is a mounting bracket that is soldered in place on the original condenser so resolder it onto the new one! Not too much heat please but it can be done. I think that is all for this time. Don't want to give too much away at once or we'll incur the editorial 'guillotine'. Next time, if you let me, we'll witter on about fitting Boyer ignition and going 12V.
AJS and Matchless Owners Club Limited : https://WWW.JAMPOT.COM/
® 2000-2026 Jampot All Rights Reserved.